When its time to plant those tomato plants, it does not take long after you plant to notice growth. And most every type of plant will require some type of support of the stem and the branches and the larger the plant is the more support it will need. If no support is given to the plants, they will susceptible to being blown over by the wind, or once the fruit begins to grow, the weight of it will break the branches.
There are various ways to support your tomato plants. Probably the most popular method among gardeners is by using a stake. These are normally small, square pieces made of wood usually, and typically around two to four feet long. This method can be used efficiently if implemented correctly. It involves driving the stake in the ground, and then securing the stem of the plant to the stake by using twine, strips of cloth, etc. avoid using anything too stiff or sharp, such as wire, because this may cut into the branches and cause them to break.
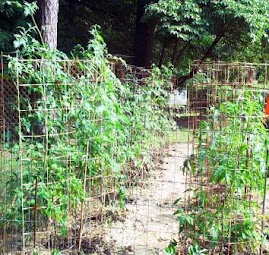
Another proven method is what’s known as the trellis method. You can do this by inserting post in the ground on each end of your row of tomatoes, and then run twine back and forth at different heights from one post to another, and train the branches through the twine as it grows. Instead of string, you can use concrete reinforcing wire, which looks a lot like fencing. Just cut a piece the length that your post are and secure it to them. The twine or reinforcing wire can be purchased at any home improvement store.
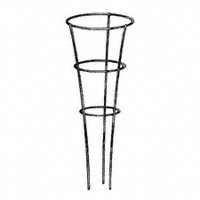
Another popular solution to supporting tomato plants is with tomato cages. You can purchase them at any garden center, or make your own. The store bought cages generally have a funnel shape, are three to four feet long and they are pushed into the ground around the plant.
My personal choice is to make your own cages out of the concrete reinforcing wire that I mentioned earlier. Just cut the wire to length, (use the formula for circumference to get the diameter cage you want), and tie together using wire, (I found bailing wire works very well).
Once your cages are built, place them around your plants and use some type of stake to hold them in place, securing the cage to the stake with twine or wire. A good stake for this is a piece of rebar about three feet long.
Some tips about the concrete reinforcing wire. It comes in a fairly large roll, so it could be difficult to handle. Be sure to wear gloves when handling the wire because of sharp points and normally it is coated with a layer of rust. You can clean and paint your cages if you wish.
The thing I like about cages, whether store bought or homemade is that once you have them, they last for years, which will save you time and money. Also, they require less maintenance of the plants because you do not have to tie up the branches, they can be easily trained through the large holes in the reinforcing wire, or the smaller store bought cages.
Whichever method you choose will work well, it’s just which way you decide to go.
Happy gardening!
There are various ways to support your tomato plants. Probably the most popular method among gardeners is by using a stake. These are normally small, square pieces made of wood usually, and typically around two to four feet long. This method can be used efficiently if implemented correctly. It involves driving the stake in the ground, and then securing the stem of the plant to the stake by using twine, strips of cloth, etc. avoid using anything too stiff or sharp, such as wire, because this may cut into the branches and cause them to break.
Another proven method is what’s known as the trellis method. You can do this by inserting post in the ground on each end of your row of tomatoes, and then run twine back and forth at different heights from one post to another, and train the branches through the twine as it grows. Instead of string, you can use concrete reinforcing wire, which looks a lot like fencing. Just cut a piece the length that your post are and secure it to them. The twine or reinforcing wire can be purchased at any home improvement store.
Another popular solution to supporting tomato plants is with tomato cages. You can purchase them at any garden center, or make your own. The store bought cages generally have a funnel shape, are three to four feet long and they are pushed into the ground around the plant.
My personal choice is to make your own cages out of the concrete reinforcing wire that I mentioned earlier. Just cut the wire to length, (use the formula for circumference to get the diameter cage you want), and tie together using wire, (I found bailing wire works very well).
Once your cages are built, place them around your plants and use some type of stake to hold them in place, securing the cage to the stake with twine or wire. A good stake for this is a piece of rebar about three feet long.
Some tips about the concrete reinforcing wire. It comes in a fairly large roll, so it could be difficult to handle. Be sure to wear gloves when handling the wire because of sharp points and normally it is coated with a layer of rust. You can clean and paint your cages if you wish.
The thing I like about cages, whether store bought or homemade is that once you have them, they last for years, which will save you time and money. Also, they require less maintenance of the plants because you do not have to tie up the branches, they can be easily trained through the large holes in the reinforcing wire, or the smaller store bought cages.
Whichever method you choose will work well, it’s just which way you decide to go.
Happy gardening!